
Most production Kubernetes clusters look 30–40% utilized while the cluster autoscaler refuses to scale down. The Pods are placed correctly, the Nodes show plenty of headroom, but every attempt to consolidate fails. The reflex is to blame the autoscaler, the workloads, or the resource requests. Anything but the scheduler.
The Kubernetes scheduler is doing exactly what it was designed to do. It just wasn’t designed to pack your cluster, and it’s worth understanding why before you start writing custom plugins or swapping out the autoscaler.
Key Takeaways
- The scheduler has one job: filter, score, bind. One decision per Pod, made once. It places Pods; it does not provision Nodes, monitor placements, consolidate workloads, or rightsize requests.
- LeastAllocated is the default and it spreads workloads, not packs them. This is intentional — failure-domain resilience over density. Bin packing is opt-in via MostAllocated or RequestedToCapacityRatio in NodeResourcesFit.
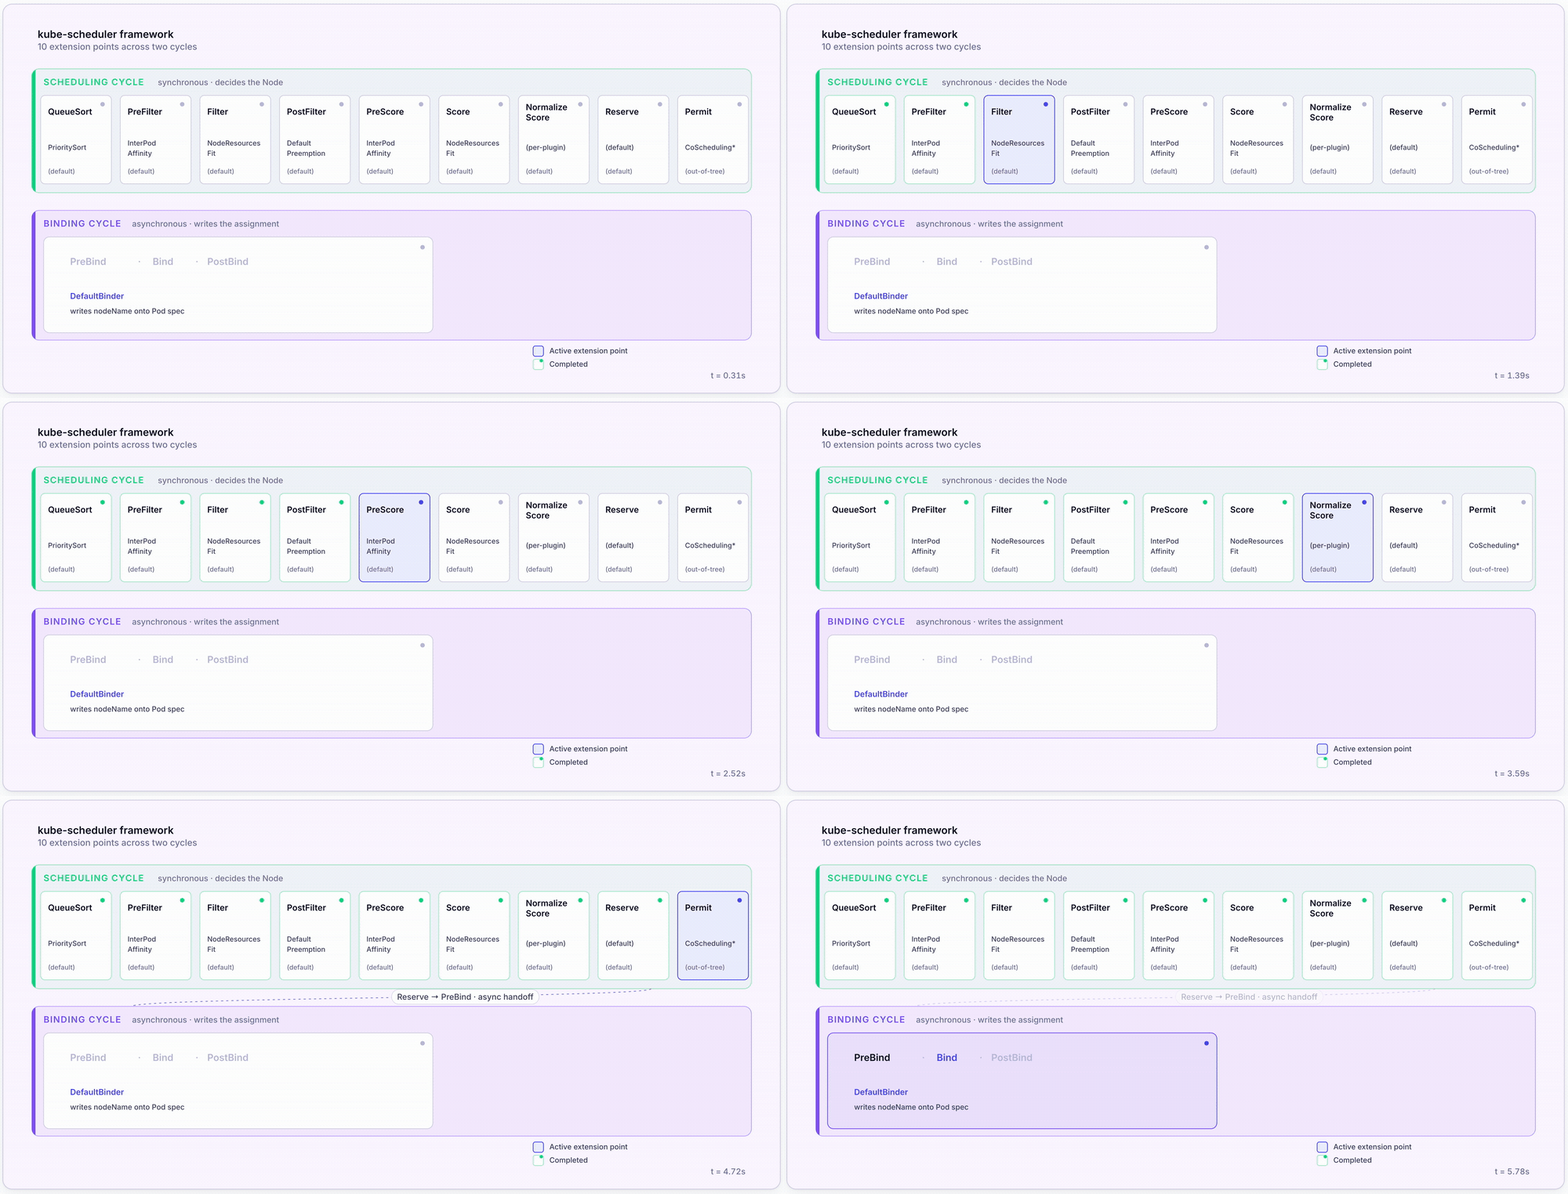
- The scheduler framework is a plugin engine with ten extension points, using filtering and scoring mechanisms.
- The scheduler operates on requests, not actual usage. A Pod requesting 2 CPUs but using 200m looks like a 2-CPU Pod to every scoring and consolidation decision. Spread workloads and stale requests both block the autoscaler from scaling down.
- The scheduler is not the autoscaler. The scheduler decides where Pods land on existing Nodes; Cluster Autoscaler and Karpenter decide which Nodes exist. Conflating the two is the most common source of “why isn’t my cluster scaling down?” confusion.
- Three-layer model: scheduler decides where, autoscaler decides which Nodes exist, ScaleOps automates Smart Pod Placement of unevictable pods and continuously rightsizes requests — the layer that actually packs the cluster. Distinct, non-overlapping responsibilities.
This article walks through the scheduler from the inside: how the filter, score, and bind pipeline actually decides where a Pod lands, what the modern scheduler framework’s extension points let you change, why the default scoring strategy spreads workloads instead of packing them, and where the scheduler’s job ends and the cluster autoscaler’s job begins. By the end, you’ll have a clean three-layer model that separates where Pods land from which Nodes exist from what packs the cluster — and a structured way to debug Pending Pods when any layer fails.
It’s written for platform engineers and SREs running production clusters who treat the scheduler as a black box and want to crack it open without rebuilding from scratch.
What the Kubernetes Scheduler Actually Does
The Kubernetes scheduler (kube-scheduler) is a control plane component that watches for unscheduled Pods and assigns each one to a feasible Node. For every Pending Pod, it runs a filter-score-bind pipeline: eliminate Nodes that can’t fit the Pod, rank the survivors, and write the Node assignment. One decision per Pod, made once.
That last sentence carries more weight than it looks. The scheduler’s contract is intentionally narrow and intentionally one-shot. It picks a Node, writes the nodeName field on the Pod spec, and moves on. It does not revisit the decision when the cluster’s actual load changes. It does not migrate Pods to balance utilization. It does not delete Nodes when they’re empty. None of that is in the job description.
This narrowness is the single most useful thing to internalize about the scheduler, because most “why is my cluster behaving like this?” questions are actually about something the scheduler isn’t responsible for.
Things kube-scheduler does not do:
- Provision or de-provision Nodes — that’s the cluster autoscaler’s job (Cluster Autoscaler, Karpenter)
- Monitor Pod placements over time — there’s no continuous re-evaluation loop
- Consolidate workloads onto fewer Nodes — that requires either the descheduler or autoscaler-driven consolidation
- Rightsize Pod resource requests or pack the cluster — those live in a separate resource management layer
A few terms get conflated frequently enough to be worth disambiguating up front.
Scheduler vs controllers. Both run on the control plane, but they reconcile different things. Controllers (Deployment controller, StatefulSet controller, and so on) reconcile desired vs actual state of higher-level objects — they create the Pods. The scheduler reconciles Pods without a Node by binding them to one. Different inputs, different outputs.
Scheduler vs autoscaler. The scheduler decides where a Pod runs on the existing pool of Nodes. Cluster Autoscaler and Karpenter decide which Nodes exist. These are separate concerns with separate failure modes — and conflating them is the most common source of “why isn’t my cluster scaling down?” confusion.
Is kube-scheduler a Pod? Yes. On clusters bootstrapped with kubeadm it runs as a static Pod on the control plane — visible via kubectl get pods -n kube-system. On managed Kubernetes (EKS, GKE, AKS), it runs on the cloud provider’s control plane, abstracted away from you.
Other tools in the ecosystem — autoscalers and resource management platforms like ScaleOps — operate around the scheduler, not inside it. Each layer has a distinct, non-overlapping responsibility, which we map at the end of this article.
How kube-scheduler Picks a Node: Filter, Score, Bind
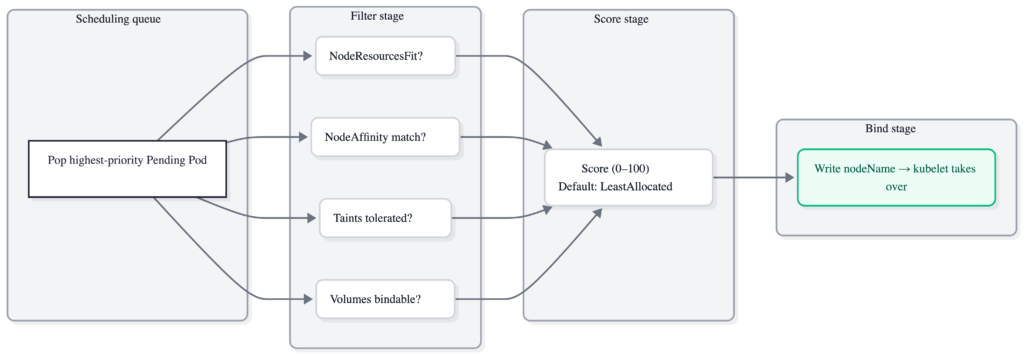
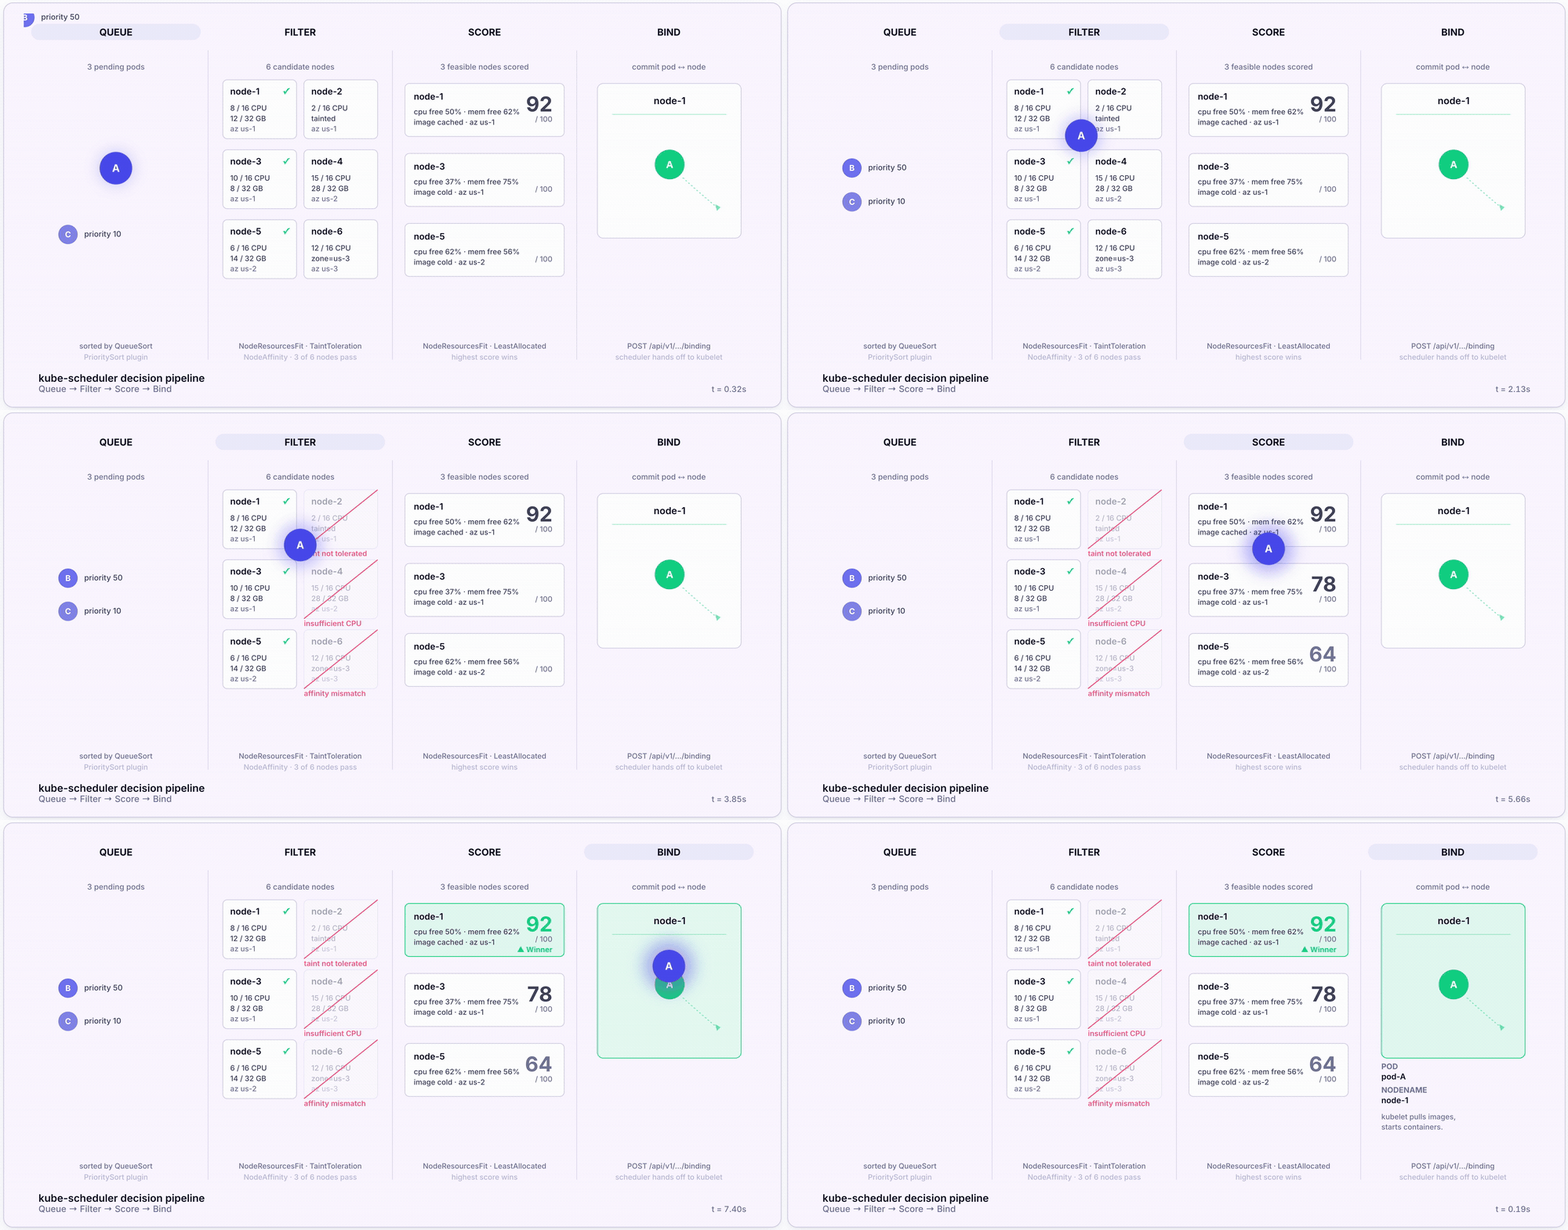
For every Pending Pod, the scheduler runs a four-stage pipeline. Here’s the full sequence:
- Pop from the scheduling queue. Pods are sorted by priority via the
QueueSortplugin (default:PrioritySort). Higher-priority Pods scheduled first. - Filter. Eliminate Nodes that can’t run the Pod. Plugins like
NodeResourcesFit(insufficient CPU or memory),NodeAffinity(label match),TaintToleration(must tolerate Node taints), andVolumeBinding(PVC must bind) each get a veto. - Score. Rank surviving Nodes 0–100. Default scoring uses the
LeastAllocatedstrategy — Nodes with the most remaining capacity score highest. - Bind. Write
nodeNameonto the Pod spec. The kubelet on the chosen Node sees the binding, pulls images, and starts containers.
That’s the entire decision loop. Most articles stop here, but the interesting questions are about the third step — because the default scoring strategy quietly shapes how every cluster behaves.
LeastAllocated: why your cluster spreads workloads
LeastAllocated is a deliberate choice by upstream maintainers. Among the feasible Nodes, the scheduler prefers the one with the most free capacity. Two Pods with identical specs land on different Nodes if both are feasible, because spreading wins on the resilience axis: if one Node dies, replicas elsewhere survive the failure.
This is the right default for high-availability workloads. It’s also the reason most production clusters look 30–40% utilized while still triggering autoscaler scale-up events when Pending Pods can’t fit.
The implicit cost is rarely covered in default-scheduler tutorials. Spread workloads make it nearly impossible for the cluster autoscaler to consolidate. Cluster Autoscaler and Karpenter scale Nodes down only when their Pods can be migrated elsewhere. If a Node has even one Pod that can’t relocate cleanly, for example a Pod marked unevictable (via karpenter.sh/do-not-disrupt for Karpenter or cluster-autoscaler.kubernetes.io/safe-to-evict: false for Cluster Autoscaler), an unsatisfied PodDisruptionBudget, or a single replica with nowhere else to go, that Node stays. With LeastAllocated thinning Pods across many Nodes, that condition is the norm, not the exception.
LeastAllocated is one of three scoring strategies that ship with NodeResourcesFit. The other two — MostAllocated and RequestedToCapacityRatio — flip the optimization toward density. More details on this in section 4.
When filtering yields zero feasible Nodes
Sometimes no Node passes the filter stage. This happens in healthy clusters under load, especially with strict NodeAffinity rules or topology spread constraints. The Pod doesn’t immediately fail — instead, the PostFilter extension point fires. The default PostFilter plugin is DefaultPreemption.
Preemption looks for lower-priority Pods on otherwise-feasible Nodes and considers evicting them to make room for the higher-priority Pending Pod. If a viable victim is found and removing it would let the Pending Pod schedule, the eviction proceeds. The Pending Pod is held until the next scheduling cycle, then placed on the freshly-cleared Node.
Without lower-priority Pods to evict — or without PriorityClass configured at all — the Pod stays Pending. kubectl describe pod surfaces the reason in the Events section: typically 0/N nodes available followed by why each Node was filtered out. Section 7’s troubleshooting checklist walks through the common patterns.
The whole pipeline at a glance
The Scheduler Framework: Plugins, Extension Points, and When to Customize
Section 2 treated the scheduler as a black box running filter → score → bind. The reality is more interesting: since Kubernetes 1.19 the scheduler has been a plugin engine, with each pipeline stage exposed as an extension point that operators can swap, augment, or replace.
If you’ve read older scheduler material, you’ll have seen the terms predicates and priorities. Those are the legacy names for what are now Filter and Score plugins. The mapping is direct — a “predicate” was a filter function; a “priority” was a scoring function — but the rest of the framework has more than just those two extension points.
The scheduler runs two distinct cycles per Pod:
- The scheduling cycle is synchronous. It decides which Node the Pod should land on.
- The binding cycle is asynchronous. It writes the assignment and lets the kubelet take over.
Plugins attach at specific extension points within those cycles.
The 10 extension points
| Extension Point | Cycle | Purpose | Example Plugin |
| QueueSort | Scheduling | Order the scheduling queue | PrioritySort (default) |
| PreFilter | Scheduling | Pre-compute Pod state, fail fast on unsatisfiable Pods | InterPodAffinity |
| Filter | Scheduling | Eliminate infeasible Nodes | NodeResourcesFit, NodeAffinity, TaintToleration |
| PostFilter | Scheduling | Run when filtering yielded zero feasible Nodes | DefaultPreemption |
| PreScore | Scheduling | Pre-compute scoring state | InterPodAffinity, NodeAffinity |
| Score | Scheduling | Rank feasible Nodes (0–100) | NodeResourcesFit, ImageLocality |
| NormalizeScore | Scheduling | Scale scores to a common range | (per-plugin) |
| Reserve | Scheduling | Tentatively allocate resources on the chosen Node | (default) |
| Permit | Scheduling | Hold binding until a condition is met (gang scheduling) | Coscheduling (out-of-tree) |
| PreBind / Bind / PostBind | Binding | Write nodeName to the Pod | DefaultBinder |
The framework is what makes the scheduler extensible without forking the binary. Want gang scheduling for ML batch jobs that must start together? Add the Coscheduling plugin at Permit. Need topology-aware placement for NUMA-sensitive workloads? Use NodeResourceTopology at Filter and Score. Network-aware scheduling for low-latency services? The NetworkAware plugin scores Nodes by inter-Pod latency.
These all live in the kubernetes-sigs/scheduler-plugins repository as production-grade, out-of-tree options. You enable them by deploying the scheduler binary that ships with that repo, or by adding a second scheduler profile alongside the default.
When should you write a custom scheduler?
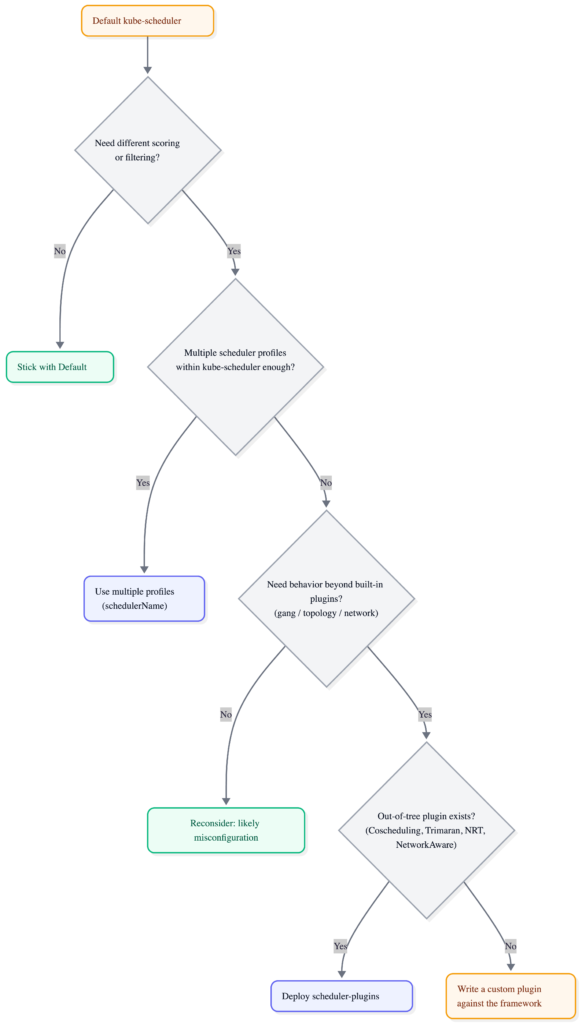
This is the most-asked question in #sig-scheduling, and the answer is almost always “you don’t need to.” Here’s the decision path:
When NOT to write a custom scheduler
Most “I need a custom scheduler” instincts are actually one of three other problems:
- You want bin packing. That’s a scoring strategy choice — flip
NodeResourcesFittoMostAllocated. Covered in section 4. - You want Node consolidation. That’s the autoscaler’s job. Cluster Autoscaler and Karpenter both consolidate. Covered in section 5.
- You want the cluster packed automatically without trading off resilience. That’s an automated resource-management problem, not a scheduler problem. Covered in section 6.
Writing a custom plugin (let alone a full custom scheduler) is genuinely the right call when you have a placement constraint that built-in and out-of-tree plugins don’t express. For everything else, stay on the default and configure it.
Bin Packing in Kubernetes: LeastAllocated vs MostAllocated vs RequestedToCapacityRatio
Bin packing is the most direct lever you have to reduce Kubernetes infrastructure spend. The default scheduler scores Nodes with LeastAllocated, which spreads Pods. That decision quietly costs money: spread Pods leave headroom on every Node, the autoscaler can’t consolidate, and the cluster runs at 30–40% utilization when it could comfortably run at 60–70%.
NodeResourcesFit ships with three scoring strategies. Switching between them is a configuration change, not a custom plugin.
Comparison
| Strategy | Scoring Behavior | Typical Use Case | Trade-off | ScaleOps Role |
| LeastAllocated (default) | Higher score = more free capacity | High-availability workloads, clusters where spread is the priority | Underutilization, more Nodes, weaker bin packing | Automates pod placement onto fewer Nodes — including unevictable pods that the default scheduler spreads — so the autoscaler has Nodes it can actually remove |
| MostAllocated | Higher score = less free capacity | Cost optimization, batch workloads, dev/test clusters | Concentration risk, weaker fault isolation, noisy-neighbor exposure | Same packing benefit without the all-or-nothing trade-off — packing decisions stay constraint-aware (PDBs, anti-affinity, topology spread) and adapt to real workload demand |
| RequestedToCapacityRatio | Custom scoring shape with per-resource weights | Mixed-resource clusters (GPU + CPU + memory), advanced tuning | Configuration complexity, harder to reason about | Same packing benefit; particularly relevant for GPU clusters where unevictable inference workloads pin Nodes that ScaleOps can consolidate |
Configuration
The default scheduler is configured via KubeSchedulerConfiguration (apiVersion kubescheduler.config.k8s.io/v1, stable since 1.25). Here’s the explicit LeastAllocated config the default scheduler runs with:
apiVersion: kubescheduler.config.k8s.io/v1
kind: KubeSchedulerConfiguration
profiles:
  - schedulerName: default-scheduler
    pluginConfig:
      - name: NodeResourcesFit
        args:
          scoringStrategy:
            type: LeastAllocated
            resources:
              - name: cpu
                weight: 1
              - name: memory
                weight: 1
To flip to bin-packing behavior, the change is a single field — type: MostAllocated. Same structure, opposite optimization.
RequestedToCapacityRatio is the more interesting case. It lets you define a custom score curve via shape and weight resources differently — useful when GPU underutilization costs more than CPU underutilization:
- name: NodeResourcesFit
  args:
    scoringStrategy:
      type: RequestedToCapacityRatio
      resources:
        - name: cpu
          weight: 1
        - name: memory
          weight: 1
        - name: nvidia.com/gpu
          weight: 10
      requestedToCapacityRatio:
        shape:
          - utilization: 0
            score: 0
          - utilization: 100
            score: 10
The linear 0 → 10 shape with weight 10 on GPU heavily prioritizes packing GPU-requesting Pods onto Nodes that already have GPU allocations. Inverting the shape (0 → 10, 100 → 0) flips back toward spreading. Anything in between is a bespoke trade-off.
Concrete scenario
Three Nodes, 16 CPU each (48 total). Four Pods, each requesting 4 CPU (16 total — exactly one Node’s worth).
- Under
LeastAllocated: Pods spread 2-1-1 across the three Nodes. Cluster utilization shows 33%. No Node can be drained — every Node has at least one Pod. - Under
MostAllocated: Pods pack onto one Node (4 Pods × 4 CPU = 16 CPU). Two Nodes sit empty and become eligible for autoscaler removal. Surviving Node sits at ~100% allocated.
Same workload, same cluster, three Nodes vs one Node. The decision compounds across thousands of Pods.
The honest trade-offs
Bin packing is not free:
- Noisy neighbors. CPU contention, memory bandwidth saturation, and cache-line thrashing all worsen as Pods concentrate. Latency-sensitive workloads (P99 SLOs, real-time inference) suffer disproportionately.
- Blast radius. A Node failure under
MostAllocatedtakes more replicas down at once. Anti-affinity rules and topology spread constraints matter more, not less, when packing. - In-place resize headroom. With Nodes near 100% allocated, there’s no room for Pod resource resize (GA in 1.33) to grant additional capacity. Pods needing to grow get evicted and rescheduled.
For batch workloads, dev clusters, and most stateless cost-sensitive services, the trade is worth it. For latency-critical workloads, leave LeastAllocated in place and use other levers.
Why scheduler-side bin packing is a partial answer
Switching the default scheduler to MostAllocated packs new Pods. It doesn’t help with the Pods already running, and it doesn’t help with the Pods the scheduler can’t move at all — single replicas, Pods with eviction-preventing annotations (karpenter.sh/do-not-disrupt for Karpenter, cluster-autoscaler.kubernetes.io/safe-to-evict: false for Cluster Autoscaler), ownerless Pods, Pods using local storage, Pods under strict PodDisruptionBudgets. ScaleOps refers to these as unevictable pods, and they’re typically what’s pinning Nodes the autoscaler would otherwise remove. The scheduler’s scoring strategy can’t reach them. Automating their placement onto fewer Nodes — without violating their constraints — is what section 6 is about.
Where the Scheduler Stops and the Autoscalers Begin
The cleanest distinction in Kubernetes resource management: the scheduler decides where a Pod runs on the existing pool of Nodes; Cluster Autoscaler and Karpenter decide which Nodes exist. Separate concerns, separate failure modes, and the most common conceptual confusion in production clusters.
When a Pod can’t fit anywhere — every Node fails the filter stage — that’s the autoscaler’s signal. The scheduler doesn’t provision Nodes. It marks the Pod Pending and moves on. The autoscaler, watching for Pending Pods, decides whether to add capacity.
Two production-grade options handle this on most clusters today.
Cluster Autoscaler
The Cluster Autoscaler (CA) is the original. It’s a controller that watches for unschedulable Pods and scales node groups up or down.
- Reacts to: Pending Pods that the scheduler couldn’t place
- Provisions: node groups — ASGs, MIGs, VMSS — homogeneous instance pools that CA scales as a unit.
- Scale-up latency: several minutes (cloud provider VM provisioning + Node registration + kubelet ready + DaemonSet startup)
- Scale-down: triggered when a Node’s allocated capacity drops below a configurable utilization threshold and all of its Pods can be migrated elsewhere
The “all of its Pods can be migrated elsewhere” condition is where bin packing meets infrastructure cost. We come back to that in a moment.
Karpenter
Karpenter is the more recent option, originally built for AWS and now expanding to other cloud providers. It takes a different architectural approach:
- Reacts to: Pending Pods that the scheduler couldn’t place
- Provisions: individual instances directly, no node groups required
- Instance selection: mixes instance types within a NodePool, picking the cheapest fit for the Pending Pod’s requirements
- Scale-up latency: typically faster than CA — fewer abstraction layers, no node group reconciliation
- Consolidation: continuously evaluates whether existing Pods could fit on cheaper Nodes; if yes, drains and replaces
- Respect for unevictable workloads: honors the
karpenter.sh/do-not-disruptannotation, which excludes a Pod from disruption events
Karpenter’s NodePool definitions specify what instance types are eligible — a single NodePool can declare “any instance with 4–16 vCPU, AMD64, in zones a/b/c, with this taint.” Karpenter then picks the cheapest instance that satisfies the Pending Pod’s constraints, rather than scaling a pre-defined group.
The scoring → autoscaler feedback loop
The scheduler’s scoring strategy determines Node density, and Node density determines what the autoscaler can consolidate. The two layers form a closed loop, and the defaults optimize both halves for resilience over cost.
It works like this. With LeastAllocated, every new Pod lands on whichever feasible Node has the most free capacity, and over thousands of placements Pods thin out across the whole Node pool. The cluster reaches steady state at low per-Node utilization — usually 30–40%. The autoscaler watches that utilization continuously and flags candidate Nodes for removal once they sit below threshold for long enough (the table below shows the exact knobs). Before actually removing a Node, both Cluster Autoscaler and Karpenter run the upstream scheduler code internally to simulate whether every Pod on that Node could be rescheduled onto the survivors. If even one Pod has no feasible target, the entire candidate is rejected and the Node stays.
That last condition is where the loop most often jams. Single replicas without anti-affinity twins, restrictive PodDisruptionBudgets (a minAvailable: 50% on a 2-replica Deployment makes neither replica evictable), Pods with eviction-preventing annotations, Pods using local storage, bare Pods without a controller — any one of these on a Node makes that Node unconsolidatable. With LeastAllocated thinning Pods across many Nodes, almost every Node ends up with at least one. Consolidation requires a clean migration; clean migrations require either fewer Pods on the Node or more places those Pods can go.
When the autoscaler does manage to drain a Node, the loop closes back on the scheduler: the displaced Pods reschedule under the same LeastAllocated strategy that spread them in the first place. The system is self-stabilizing toward spread. That’s the pattern most operators eventually recognize — 30–40% allocated, repeated 0 candidates for scale-down lines in the autoscaler logs, a long tail of Nodes pinned by one or two unevictable Pods each. Nothing is broken. The two layers are working exactly as designed; the design just doesn’t optimize for cost.
You can shorten the loop in three ways.
- Switch the scheduler to
MostAllocatedand new Pods pack onto fewer Nodes from the start — but Pods already running stay where they are. - Tune the autoscaler thresholds (raise the utilization threshold to
0.65, drop the unneeded time to 5 minutes) and consolidation reacts faster — but aggressive thresholds churn Nodes during normal load fluctuation. - Address the unevictable Pods directly — restructure single replicas, audit
safe-to-evict: falseannotations, relax over-restrictive PDBs — and the system finally has Pods it can move.
The third is the only fix that addresses the root cause.
Comparison table covering CA vs Karpenter on the loop-relevant knobs:
| Cluster Autoscaler | Karpenter | |
| Scan interval | 10s (--scan-interval) | Continuous reconciliation |
| Underutilization threshold | <0.5 allocated (--scale-down-utilization-threshold) | Implicit — pods could fit elsewhere cheaper |
| Wait time before removal | 10 min (--scale-down-unneeded-time) | consolidateAfter (configurable) |
| Migration check | Simulates rescheduling using upstream scheduler code | Same simulation + can replace Node with cheaper instance |
| Consolidation modes | Remove only | WhenEmpty or WhenEmptyOrUnderutilized (consolidationPolicy) |
| Blocked by — PDB violation | Skips Node | Skips Node |
| Blocked by — opt-out annotation | cluster-autoscaler.kubernetes.io/safe-to-evict: false | karpenter.sh/do-not-disrupt: true |
| Blocked by — local storage | Yes by default (--skip-nodes-with-local-storage=true) | Yes by default |
| Blocked by — bare Pods (no controller) | Yes | Yes |
Blocked by — kube-system Pods | Yes unless they have a PDB | Yes unless they have a PDB |
Serverless: a different shape of problem
Worth a brief mention. AWS Fargate and GKE Autopilot bypass Node management entirely. You define Pods; the cloud provider runs them on capacity you don’t directly see. No node groups, no Karpenter, no CA. The trade-off is control and cost predictability — you pay per-Pod resource overhead, and you can’t tune the scheduler or run privileged DaemonSets in most configurations. Different shape of problem, out of scope here.
Where the third layer fits
Both Cluster Autoscaler and Karpenter make consolidation decisions based on whether a Node’s Pods can be migrated and whether existing Pods could fit elsewhere. Two things consistently block them: unevictable Pods that can’t move, and resource requests that overstate what workloads actually need. Address both, and consolidation becomes possible without changing how the scheduler or autoscaler works. ScaleOps does both — automating placement of unevictable pods onto fewer Nodes, and continuously rightsizing requests to reflect real consumption.
The Three-Layer Demarcation: Scheduler, Autoscaler, Resource Management
The Kubernetes scheduler decides where Pods land on existing Nodes. Cluster Autoscaler and Karpenter decide which Nodes exist. A resource management layer decides what packs the cluster — by automating placement of pods the scheduler can’t move, and by keeping the resource requests that feed every scheduler and autoscaler decision aligned with actual consumption. Three layers, three distinct jobs, no overlap.
This is also the answer to the article’s opening problem. A cluster that looks 30–40% utilized with an autoscaler that refuses to scale down isn’t broken — it’s a layered system where the third layer is missing, and that gap shows up as wasted capacity in the layers below.
What the third layer actually does
Two jobs sit naturally together at this layer:
Smart Pod Placement. Continuously place pods — including the ones the default scheduler can’t move — onto fewer Nodes, so unused Nodes become eligible for autoscaler removal. The Pods that block consolidation are usually a small set with predictable patterns: single replicas without anti-affinity twins, Pods with eviction-preventing annotations (karpenter.sh/do-not-disrupt for Karpenter, cluster-autoscaler.kubernetes.io/safe-to-evict: false for Cluster Autoscaler), ownerless Pods, Pods using local storage, Pods under strict PodDisruptionBudgets. ScaleOps refers to these as unevictable pods. They’re not unschedulable — they ran fine when first placed — but the cluster has no clean mechanism to relocate them once they’re sitting where they are. Smart Pod Placement is what makes that relocation safe and automatic.
Continuous rightsizing. Adjust Pod resource requests — CPU, memory, sometimes GPU — to track observed consumption rather than the values an engineer wrote in a YAML manifest months ago. The Vertical Pod Autoscaler (VPA) is the upstream Kubernetes building block for this; ScaleOps extends the pattern with workload-aware logic and integration with the placement layer so packing decisions reflect what workloads actually use.
These two jobs are coupled. Bin packing without accurate requests packs based on inflated values and creates over-saturated Nodes. Rightsizing without placement leaves unevictable workloads where they are. Combined, they give the scheduler and the autoscaler accurate inputs and movable Pods to work with.
The three layers
| Layer | Job | Tool | Where ScaleOps fits |
| Where Pods land | Filter, score, bind | kube-scheduler | Operates alongside the default scheduler; scoring decisions remain the scheduler’s |
| Which Nodes exist | Provision and de-provision Nodes based on Pending Pods and evictable workload patterns | Cluster Autoscaler, Karpenter | Frees Nodes for autoscaler removal by relocating unevictable pods; supplies accurate requests for consolidation evaluation |
| What packs the cluster | Automate placement of unevictable pods + continuously rightsize requests | ScaleOps | — |
What ScaleOps actually contributes
- Automated placement of unevictable pods. Pods with eviction-preventing annotations, local storage, strict PDBs, ownerless workloads, and other unevictable patterns get continuously placed onto fewer Nodes — so the cluster autoscaler can scale down more Nodes without impacting application performance or degrading reliability.
- Continuous request accuracy. Pod resource requests reflect observed consumption rather than initial guesses. Every scoring decision the scheduler makes — and every consolidation decision Cluster Autoscaler or Karpenter makes — is downstream of this data.
- Constraint preservation. Existing scheduling rules —
nodeAffinity,podAntiAffinity,topologySpreadConstraints, taints and tolerations, PodDisruptionBudgets — continue to apply unchanged. The platform operates alongside the default scheduler, not around it.
There’s a parallel here with the scaling-metric problem covered in Why CPU Utilization Is the Worst Scaling Metric in Kubernetes. That article’s argument was that horizontal scaling decisions made on lagging metrics produce predictably bad outcomes; the fix is to scale on metrics that reflect what the workload is actually doing. The pattern repeats one layer down: scheduler and autoscaler decisions made on stale requests, with no way to relocate unevictable pods, produce predictably bad density outcomes; the fix is automated placement plus accurate requests.
What ScaleOps does NOT do
The boundary matters as much as the role. ScaleOps:
- Does not replace
kube-scheduler. The default scheduler still owns every placement decision the scheduler is responsible for. - Does not replace Cluster Autoscaler or Karpenter. Those tools still own Node provisioning and removal.
- Does not remove Nodes. It marks Nodes as candidates for consolidation; the autoscaler decides whether to act.
- Does not bypass any existing scheduling constraint.
nodeAffinity, anti-affinity rules, taints, topology spread, and PodDisruptionBudgets all hold.
This restraint is the point. The scheduler and autoscalers are mature, well-understood control planes. A fourth control plane that contends with the existing layers tends to introduce new failure modes. Operating alongside them, on the workloads they can’t move and the data they’re already reading, does not.

The default Kubernetes scheduler isn’t broken — it’s deliberately narrow. Filter, score, bind, one decision per Pod, made once. Every other behavior people want from a scheduler — packing the cluster, monitoring placements, removing empty Nodes, rightsizing requests — lives somewhere else by design. The reason most production clusters look 30–40% utilized while the autoscaler refuses to scale down isn’t a bug in any single layer. It’s that the layered system is missing the pieces that connect scoring decisions, autoscaler consolidation, and accurate workload data into something that actually packs the cluster. The three-layer model is the practical fix. Keep the default scheduler doing what it does well. Keep the autoscaler doing what it does well. Add the layer that automates Smart Pod Placement of unevictable pods and continuously rightsizes requests — and the system that already exists starts behaving the way you wanted it to behave in the first place.
Two low-friction starting points before any platform change:
- Look at your scheduler scoring strategy. Run
kubectl get configmap -n kube-system kube-scheduler-config -o yaml(or check your managed Kubernetes scheduler configuration) and confirm whether you’re onLeastAllocatedor something else. Most clusters never check. - Audit your unevictable pods. Find Pods with eviction-preventing annotations (
karpenter.sh/do-not-disruptorcluster-autoscaler.kubernetes.io/safe-to-evict: false), restrictive PodDisruptionBudgets, single replicas without anti-affinity twins, or local-storage volumes. These are the Pods pinning Nodes the autoscaler would otherwise remove. The list is usually shorter than people expect.
ScaleOps Smart Pod Placement runs alongside the default scheduler, respects every existing constraint, and operates on the workloads the scheduler can’t move — automating placement of unevictable pods and continuously rightsizing requests so the autoscaler has Nodes it can actually consolidate.
Try ScaleOps free → See how unevictable pods are pinning Nodes in your cluster — and how much consolidation headroom you’re leaving on the table.
Book a demo → Walk through the three-layer model with our team and see Smart Pod Placement running on your own cluster data.
Kubernetes Scheduler FAQ
What is the Kubernetes scheduler and how does it work?
The Kubernetes scheduler (kube-scheduler) is a control plane component that watches for unscheduled Pods and assigns each one to a feasible Node.
It runs every Pending Pod through a four-stage pipeline: pop from the priority-sorted scheduling queue, filter out infeasible Nodes, score the survivors, and bind the Pod by writing nodeName onto its spec.
One decision per Pod, made once.
How does kube-scheduler choose which Node a Pod runs on?
It runs four stages per Pod:
- Pop from the scheduling queue, sorted by priority via
QueueSort. - Filter, eliminate Nodes that fail any plugin’s feasibility check, such as
NodeResourcesFit,NodeAffinity,TaintToleration,VolumeBinding. - Score, rank the survivors 0–100, default:
LeastAllocated. - Bind, write the chosen Node onto the Pod.
The kubelet on that Node takes over from there.
What is the difference between the Kubernetes controller and the scheduler?
Both run on the control plane but reconcile different things.
Controllers (Deployment, StatefulSet, ReplicaSet, etc.) reconcile desired vs actual state of higher-level objects, they create the Pods.
The scheduler reconciles Pods without a Node by assigning each one to a feasible Node.
Different inputs, different outputs, different failure modes.
Is kube-scheduler a Pod or a control plane component?
Both.
It is a control plane component.
On clusters bootstrapped with kubeadm, that component runs as a static Pod visible via kubectl get pods -n kube-system.
On managed Kubernetes (EKS, GKE, AKS), it runs on the cloud provider’s hosted control plane, abstracted away from the user.
When should I use a custom Kubernetes scheduler?
Almost never.
The decision path:
- Try multiple scheduler profiles within the default
kube-schedulerfirst. - If that is not enough, deploy an existing out-of-tree plugin from
kubernetes-sigs/scheduler-pluginssuch as Coscheduling, Trimaran, NodeResourceTopology, NetworkAware. - If that is still not enough, write a custom plugin against the scheduler framework.
A fully custom scheduler is the last resort.
Kubernetes scheduler vs scheduler plugins: what is the difference?
The scheduler is the binary (kube-scheduler) that runs the scheduling cycle.
Plugins are the modular pieces of behavior that attach to specific extension points within that cycle.
There are ten extension points in the modern scheduler framework, including QueueSort, Filter, Score, and Permit.
The scheduler binary loads plugins at startup.
Switching out a plugin does not require forking the scheduler.
How do node affinity, taints, and tolerations affect Kubernetes scheduling?
All three operate at the Filter stage of the scheduling pipeline, eliminating Nodes that do not match.
nodeAffinityrequires the Node to carry specific labels.- Taints repel Pods unless the Pod has a matching toleration.
A Node that fails any filter check is dropped from consideration entirely, it never reaches the Score stage.
This is why a misconfigured affinity rule produces a “0 nodes available” Pending Pod even when the cluster has plenty of free capacity.